Garment Button-front pinafore dress
Level Intermediate
Sizes XXS – 4XL
Fabric Medium-weight woven + lining
Pieces 9 (6 fabric, 3 lining)
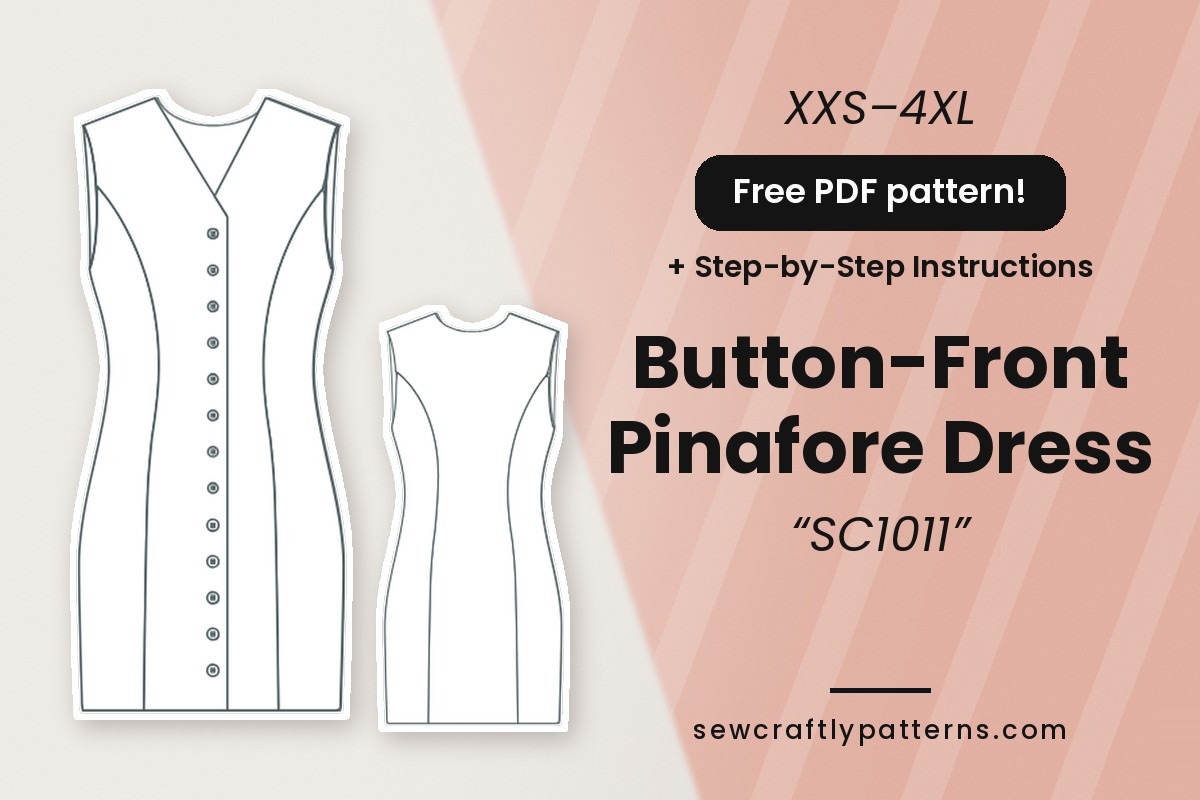
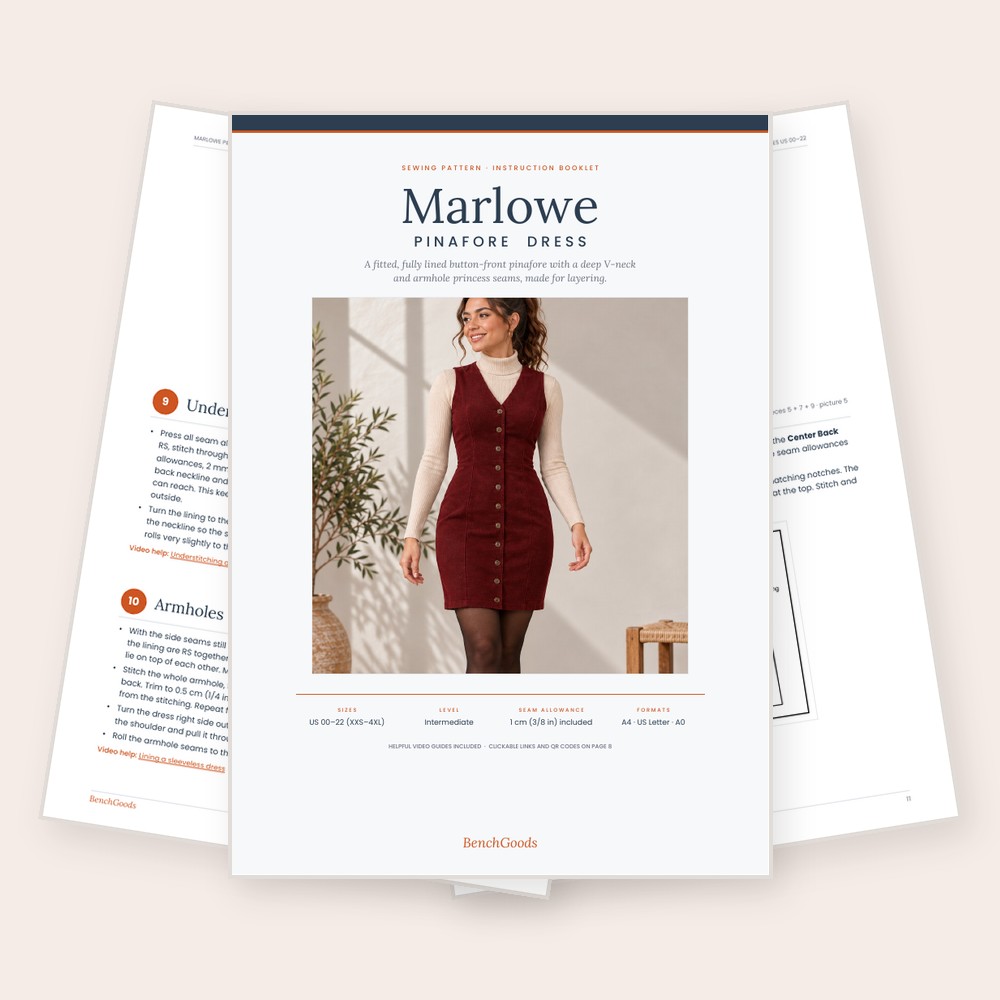
The Marlowe is a close-fitting sleeveless pinafore dress that buttons all the way down the front. A deep V-neck shows off whatever you wear underneath, from a fine turtleneck to a crisp blouse, and long armhole princess seams shape it through the bust, waist and hips without a single dart. It is fully lined, so the inside looks as neat as the outside, and it ends just above the knee.
This free button front pinafore dress sewing pattern is made for medium-weight woven fabrics with some body, like fine corduroy or needlecord, cotton twill, light denim or wool flannel. The neckline and front edges are finished with an interfaced facing that is joined to the lining, the armholes are sewn by machine and turned through the shoulders, and the side seams of the dress and lining are closed in one go. There is no zipper and no back seam: you get in and out through the twelve front buttons.
Materials
- Main fabric: 2.1 to 2.4 m (2 3/8 to 2 5/8 yd) of 150 cm wide medium-weight woven: fine or medium-wale corduroy, needlecord, cotton twill, light denim, wool flannel or suiting (see the fabric table below)
- Lining: 1.2 to 1.6 m (1 3/8 to 1 3/4 yd) of 150 cm wide cupro (Bemberg), viscose lining, or cotton lawn or voile
- Fusible interfacing: 1.2 m (1 3/8 yd), 90 cm (36″) wide, light to medium weight, for the front and back neck facings
- Buttons: 12 buttons, 1 cm (3/8″) across, the same for every size
- Matching all-purpose thread and a hand-sewing needle for the hem
- Chalk or a washable marking pen, pins or clips
Pattern pieces
- 1 Center front, main fabric: cut 2 (a mirrored pair)
- 2 Side front, main fabric: cut 2 (a mirrored pair)
- 3 Side front lining, lining: cut 2 (a mirrored pair)
- 4 Center back, main fabric: cut 1, single layer, not on a fold
- 5 Center back lining, lining: cut 1, single layer, not on a fold
- 6 Side back, main fabric: cut 2 (a mirrored pair)
- 7 Side back lining, lining: cut 2 (a mirrored pair)
- 8 Front neck facing, main fabric + fusible interfacing: cut 2 + 2 (mirrored pairs)
- 9 Back neck facing, main fabric + fusible interfacing: cut 1 + 1
Pieces 4 and 5 are drawn whole with a center line, so cut them from a single layer, right side up. The word FOLD near a notch on piece 3 is only a matching point: piece 3 is not cut on the fold.
New to PDF patterns? Start here
Our free step-by-step guides take you from your measurements to a printed pattern:
- How to take your body measurements: what to measure and how, in 10 minutes.
- How to choose your size: which measurement to follow, and what to do between sizes.
- How to print and assemble your pattern: A4 or US Letter, the test box, and taping the pages.
Get the pattern
Free PDF pattern, with one file per size from 00 to 22. Share your make with #sewcraftly!
Print page 1 at 100% and check that the test square measures 10 cm (4 in). New to PDF patterns? Read how to print and assemble a PDF pattern.
Printable sewing tutorial
Need help completing the project?
Get the full printable tutorial for the Marlowe pinafore: detailed step-by-step sewing instructions with clear illustrations, line sketches, a sizing guide and the list of materials you need.
- Illustrated diagrams for every lining and assembly step
- Size charts, finished measurements and fabric amounts per size
- Video guides for the key techniques, with links and QR codes
- Printable PDF, instant download
Design details and fit of the Marlowe pinafore
The Marlowe is a slim, close-fitting dress with no waist seam. Long princess seams start at the armhole on both the front and the back and run all the way to the hem, so the shaping happens in the seams rather than in darts. The center back is cut in one piece, with no back seam and no zipper. At the front, a deep V-neck turns into a straight button opening with twelve small buttons down to the hem.
The dress has about 7 cm (2 3/4″) of ease at the waist and about 5 cm (2″) at the low hip, and it is about 100 cm (39 1/2″) long from the shoulder to the hem in a middle size, so it ends just above the knee. It is drafted for a height of 168 cm (5′6″).
Difficulty and what to know before you start
The pattern is rated intermediate. The sewing itself is straightforward, but the lining is attached by machine in a set order, so read all the steps once before you cut. The trickiest moment is step 10, when you stitch the armholes and pull the dress right side out through the shoulders: take it slowly and it works every time. You will also make twelve buttonholes, so test one on a scrap first.
Tools you will want: a sewing machine with a buttonhole foot, an overlocker or a zigzag stitch to finish the edges, an iron and a press cloth, a fluffy towel if you sew corduroy, pins or clips, and chalk or a washable pen. Use a new 80/12 needle for most wovens, or 90/14 for denim or thick corduroy.
Sizing guide
Drafted for a height of 168 cm (5′6″). Choose your size by your bust measurement and compare it with the body measurements below, not with your ready-to-wear size. If your hips fall in another size, blend the side and princess seams between the two sizes from the waist down. Not sure? Read how to choose your size.
Letter sizes: 00/0 = XXS · 2/4 = XS · 6/8 = S · 10/12 = M · 14 = L · 16 = XL · 18 = XXL · 20 = 3XL · 22 = 4XL
Body measurements
| cm | 00 | 0 | 2 | 4 | 6 | 8 | 10 | 12 | 14 | 16 | 18 | 20 | 22 |
|---|---|---|---|---|---|---|---|---|---|---|---|---|---|
| Bust | 80 | 82.5 | 85 | 87.8 | 90.2 | 92.8 | 95.2 | 99.2 | 104.2 | 109.2 | 114.2 | 119.2 | 124.2 |
| Waist | 63.5 | 66 | 68.8 | 71.2 | 73.8 | 76.2 | 78.8 | 82.8 | 87.5 | 93.2 | 99 | 104.8 | 110.5 |
| Hips | 87.8 | 90.2 | 92.8 | 95.2 | 98 | 100.2 | 102.8 | 106.5 | 111 | 115.5 | 120.8 | 125.8 | 130.8 |
Finished garment measurements
| cm | 00 | 0 | 2 | 4 | 6 | 8 | 10 | 12 | 14 | 16 | 18 | 20 | 22 |
|---|---|---|---|---|---|---|---|---|---|---|---|---|---|
| Waist | 70.5 | 73 | 75.8 | 78.2 | 80.8 | 83.4 | 85.9 | 90 | 94.9 | 100.7 | 106.6 | 112.5 | 118.3 |
| Low hip | 93.2 | 95.8 | 98.7 | 101.9 | 105.5 | 108.9 | 112 | 116.2 | 120.9 | 126.4 | 131.8 | 137.5 | 142.7 |
| Hem width | 83.9 | 86.4 | 89.4 | 92.6 | 96.2 | 99.6 | 102.7 | 106.8 | 111.5 | 117.1 | 122.4 | 128.1 | 133.4 |
| Front length | 98.7 | 98.9 | 99.3 | 99.7 | 100 | 100.6 | 100.9 | 101.7 | 102.7 | 103.3 | 104.2 | 105.2 | 106.2 |
| Back length | 98.1 | 98 | 98.3 | 98.4 | 98.5 | 98.5 | 98.6 | 99 | 99.2 | 99.3 | 99.6 | 99.9 | 100.3 |
| Across shoulders | 37 | 37.2 | 37.7 | 38.1 | 38.4 | 38.6 | 38.7 | 39.6 | 40.2 | 40.6 | 41 | 41.7 | 42.3 |
Waist, low hip and hem width are full circumferences. Front length is measured from the high point of the shoulder (at the neck) to the hem; back length from the back neckline at center back to the hem. Compare them with a dress that fits you well.
Fabric requirements
| cm | US 00–6 | US 8–14 | US 16–22 |
|---|---|---|---|
| Main fabric, 150 cm wide | 210 | 230 | 240 |
| Main fabric, 115 cm wide | 230 | 230 | 240 |
| Lining, 150 cm wide | 120 | 120 | 160 |
| Lining, 115 cm wide | 190 | 200 | 210 |
| Interfacing, 90 cm wide | 120 | 120 | 120 |
Every piece was laid out with all pieces facing the same direction, so these amounts also work for corduroy and other napped fabrics, plus about 8 % for shrinkage and straightening. The largest size in each group was used. Pre-wash your fabric before cutting.
Common fit adjustments
Length. To lengthen or shorten, add or remove the same amount on every long piece (1 to 8) about 15 cm (6″) above the hem, then redraw the side lines smoothly. The twelve buttons still fit: just respace the lowest ones.
Between two sizes. Choose by your bust and blend to the hip size from the waist down along the side and princess seams. See how to take your body measurements if you want to double-check.
Sewing notes
Fit & style
Choose by bust and blend at the hips if needed. The ease is already built in for a close fit, so do not size down. Check the length against the finished lengths in the table.
Fabrics
Medium-weight wovens with body: corduroy or needlecord, cotton twill, light denim, wool flannel or suiting, or a linen blend for summer. Not suitable for stretch knits or very bulky fabrics.
Cutting & sewing
Follow the grainline on every piece. Clip notches no deeper than 3 mm (1/8″), mark the 12 button positions on the right front (as worn), and press every seam before you cross it.
Choosing fabric for a pinafore dress
A pinafore needs a fabric that holds its shape over the layer you wear underneath. Fine or medium-wale corduroy is the classic choice for autumn and winter, cotton twill and light denim (7 to 10 oz) give a more casual dress, and wool flannel or suiting makes a smart one. For a summer version worn on its own, try a linen blend.
With corduroy, needlecord or any napped fabric, cut every piece with the nap running the same way (usually up the body, for a richer colour) and press face down on a fluffy towel so the pile is not crushed. For the lining, cupro or viscose lining slides nicely over sweaters and tights, and cotton lawn or voile gives a cooler, all-cotton dress.
Sewing steps
Seam allowance is 1 cm (3/8″) unless stated. Sew right sides together and press every seam before you cross it with another one. The dress and the lining are made separately, then joined by machine in the order below.
- Staystitch and interface. Staystitch the V-neck edge of each center front (1) and the neckline of the center back (4) 8 mm (5/16″) from the edge, so the bias edges do not stretch. Fuse the interfacing to the wrong side of both front neck facings (8) and the back neck facing (9), pressing without sliding the iron, and let them cool flat. The front facing is interfaced over its whole length to support the buttons and buttonholes.
- Sew the front princess seams. Pin a side front (2) to a center front (1), right sides together, matching the notches. The curves go in opposite directions, so pin often and ease them together. Stitch from the shoulder to the hem, clip into the seam allowance at the bust curve without cutting the stitching, finish the allowances separately and press open. Repeat on the other side.
- Sew the back princess seams. Pin a side back (6) to each long edge of the center back (4), matching the notches. Stitch from the shoulder to the hem, clip the curves, finish the allowances separately and press open.
- Sew the dress shoulders. Pin the front to the back at the shoulders, right sides together, matching the princess seams. Stitch, finish the allowances separately and press open. Leave the side seams open: they are sewn together with the lining in step 11.
- Make the front lining units. Pin a side front lining (3) to the long inner edge of a front neck facing (8), the edge opposite the front opening, right sides together and matching the notches, including the double notch near the top. Stitch, clip the curve and press the allowances towards the lining. Make a left and a right unit.
- Make the back lining unit. Pin the outer (lower, longer) edge of the back neck facing (9) to the neckline of the center back lining (5), matching the centers. Stitch, clip and press towards the lining. Then sew a side back lining (7) to each side of the center back lining, matching notches, and press open. The side back linings start at the armhole, so they are shorter than the dress pieces at the top.
- Sew the lining shoulders. Place the two front lining units on the back lining unit, right sides together, and stitch the shoulders, facing to facing and lining to lining. Press open. The lining seams do not need finishing. Leave the side seams open.
- Sew the front edges and neckline. Lay the dress flat, right side up, and place the lining on top, right side down. Match the shoulder seams, the V-neck points, the center back and the front edges, and pin all around. At the bottom, the facing stops 2 cm (3/4″) above the dress edge: that is correct, because the hem will fold up to meet it. Stitch in one go from the lower edge of one facing, up the front edge, around the V-neck and back neckline and down the other front edge. Trim to 5 mm (1/4″), clip the back neckline curve and clip right up to the stitching where each straight front edge turns into the V.
- Understitch and turn. Press all the allowances towards the lining. From the right side, stitch through the lining and the allowances 2 mm (1/16″) from the seam, around the back neckline and as far down the V as your machine can reach. Turn the lining to the inside and press so the seam sits exactly on the edge, or rolls very slightly to the inside.
- Sew the armholes and turn the dress. With the side seams still open, fold the lining back over the dress at one armhole so the armhole edges lie right sides together, matching the shoulder seams and notches. Stitch the whole armhole from the front side edge, over the shoulder, to the back side edge. Trim to 5 mm (1/4″), clip the curves and notch the lining allowance about 2 mm from the stitching. Repeat for the other armhole. To turn the dress, reach in between the dress back and the back lining, grab one front at the shoulder and pull it through the shoulder to the back. Repeat for the other front, then roll the armhole seams to the edge and press.
- Sew the side seams. Open out one side: lift the lining away so the dress front and back lie right sides together, and the lining front and back lie right sides together, in one long line with the armhole seams meeting in the middle. Pin, matching the armhole seams exactly and all the notches, and stitch one continuous seam from the lining hem, through the armhole seam, to the dress hem. Press open, finish the dress allowances near the hem if your fabric frays, turn the lining back inside and repeat on the other side.
- Hem the dress. Finish the lower edge of the dress and press up the 3 cm (1 1/8″) hem all around, easing in any fullness at the curved side seams. Blind-stitch it by hand, picking up only a thread of the dress, or topstitch it by machine on a casual fabric like denim. At each front, turn the 1 cm (3/8″) lower allowance of the front neck facing under and hand-stitch the facing over the hem allowance so the corner is closed and neat.
- Hem the lining. Let the dress hang for a moment so the lining settles. The lining hangs free and should end about 2 to 3 cm (1″) above the finished dress hem. Turn up 5 mm (3/16″) twice and stitch close to the inner fold, stopping where the lining meets the front facing, and finish that short end by hand. If you like, join the lining to the dress at each side seam with a 2 to 3 cm thread chain so it does not ride up.
- Buttonholes, buttons and final press. Transfer the 12 button marks to the right front (as worn) and make horizontal buttonholes 1.3 cm (1/2″) long through the dress, interfacing and facing, starting at the mark nearest the front edge. Open them carefully, with a pin across the end to stop the seam ripper. Lap the right front over the left, matching the center fronts, mark the button positions through the buttonholes and sew on the buttons. Give the whole dress a final press from the inside with a press cloth.
Tips and common mistakes
Read the lining order first. The lining is attached by machine in a set order: front edges and neckline, then armholes, then side seams. Sewing the side seams too early makes the armholes impossible to turn.
Ease the princess curves, do not stretch them. The two edges curve in opposite directions. Pin at every notch and in between, and sew with the shorter, more curved edge on top.
Clip right to the stitching at the turn of the V. A clip that stops short leaves a pucker where the front edge meets the neckline.
Keep the nap in one direction. On corduroy, a piece cut upside down looks a different colour. Mark the top of every piece before you lift the pattern off.
Test the buttonholes. Make one test buttonhole through fabric, interfacing and facing, exactly as on the dress, before you sew the twelve real ones.
Variations to try
Summer button-front dress. Sew it in linen or light denim and wear it on its own, without a layer underneath.
Open layer. Leave a few buttons undone and wear it open over a slip dress or a long tee.
Contrast buttons. Brass, horn or wooden buttons change the whole look of the dress with no change to the pattern.
How to style the Marlowe pinafore
Autumn and winter: over a fine-knit turtleneck with tights and ankle boots.
Smart days: over a white shirt or a Peter Pan collar blouse.
Make a matching jacket: pair it with our button front jacket sewing pattern in the same fabric for a coordinated look.
Care
Follow the care instructions of your main fabric and pre-wash it the same way before cutting. Wash corduroy inside out on a gentle cycle, and press from the inside on a towel to protect the pile.
Questions
Is seam allowance included?
Yes: 1 cm (3/8″) on all seams, a 3 cm (1 1/8″) hem on the dress, a 1 cm hem on the lining and 1 cm on the lower edges of the facings.
Which paper sizes are included?
The free download comes as a printable PDF, with one file per size from 00 to 22.
Which size should I choose?
Choose by your bust measurement using the body measurement table, not your ready-to-wear size. If your hips are in another size, blend between the two sizes from the waist down.
What fabric is best for a pinafore dress?
A medium-weight woven with some body: fine or medium-wale corduroy, needlecord, cotton twill, light denim, wool flannel or suiting. A linen blend works for summer. Stretch knits and very bulky fabrics are not suitable.
How much fabric do I need?
About 2.1 to 2.4 m of 150 cm wide main fabric, 1.2 to 1.6 m of 150 cm wide lining and 1.2 m of fusible interfacing, depending on your size. See the fabric table for 115 cm wide fabric.
Does the dress have a zipper?
No. There is no zipper and no back seam: the dress opens all the way down the front with 12 buttons of 1 cm (3/8″).
Can I skip the lining?
The pattern is designed fully lined: the lining pieces are joined to the neck facings and finish the armholes. The free steps describe the lined version only.
How do I lengthen or shorten the dress?
The pattern is drafted for 168 cm (5′6″). Add or remove the same amount on every long piece about 15 cm above the hem, redraw the side lines smoothly and respace the lowest buttons.
Is this pinafore good for beginners?
It is rated intermediate. A confident beginner can sew it by following the steps in order; the trickiest moment is turning the dress through the shoulders after the armholes in step 10.
Happy sewing!
Love our free patterns? Buy us a coffee to keep them coming, or simply share, pin and comment. Thank you!
 Support me on Ko-fi
Keep sewing