Learning how to read a sewing pattern turns a page full of lines, arrows and triangles into a clear map. Every mark on a pattern piece tells you how to place it on the fabric, how many to cut, and how the pieces fit together. Once you know the dozen or so symbols, you can follow any pattern, ours or another brand’s.
Time 10 min read
Level Beginner
For Every PDF pattern
Tools Printed pattern, chalk, scissors
1. What is on a pattern piece
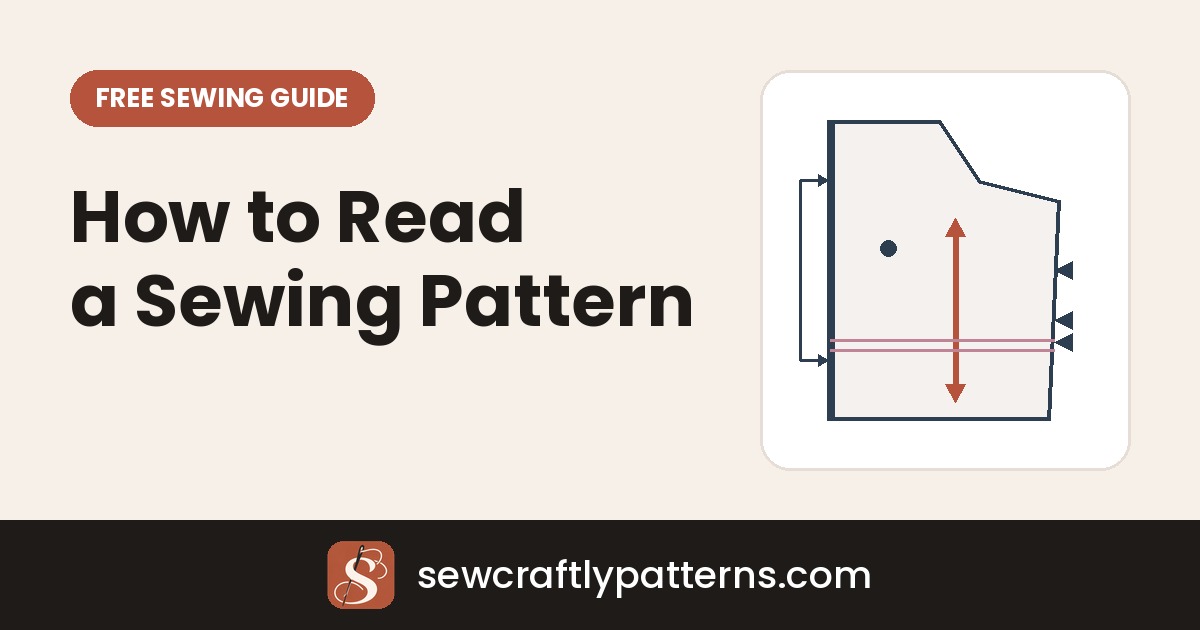
Each piece carries the same kind of information. Look for the piece name (front, back, sleeve, collar), the cutting instruction (for example Cut 2 or Cut 1 on fold), the size lines, and the markings that help you cut and sew it. The drawing below shows where they usually sit.
2. Sewing pattern symbols and what they mean
| Symbol | What it looks like | What to do |
|---|---|---|
| Grainline | A long straight arrow, with a point at one or both ends | Lay the piece so the arrow runs parallel to the selvage. Measure from both ends of the arrow to the selvage: the distance must match. |
| Place on fold | A bracket with arrows pointing to one edge, or the words Place on fold | Fold the fabric and put that edge exactly on the fold. Do not cut along it. You get one wide, symmetrical piece. |
| Notches | Small triangles or short lines on the cutting line | Match them to the notches on the next piece when you pin. One notch is usually the front, two notches the back. |
| Dots and circles | Small filled or open circles | Mark them. They show where a dart ends, where to stop stitching, or where to place a pocket. |
| Lengthen / shorten line | Two parallel lines across the piece | Cut or fold here to change the length. See how to lengthen or shorten a sewing pattern. |
| Dart | A V or diamond shape drawn inside the piece | Mark both legs and the point. Fold so the legs meet and stitch to the point. |
| Button and buttonhole | A cross or small circle for the button, a short line for the buttonhole | Mark the position and the length of each buttonhole on the right side of the fabric. |
| Pleat or tuck | Two lines with an arrow between them | Fold the fabric in the direction of the arrow, bringing one line onto the other. |
| Gathering line | A wavy line, or two dots with gather between | Sew two rows of long stitches between the marks and pull them to gather. |
3. Size lines and seam allowance
Many patterns print all sizes on one sheet, each with its own line style or colour. Our PDF patterns go one step further: each size has its own file, so there is only one cutting line to follow. If you are not sure which file to open, read how to choose your sewing pattern size.
The seam allowance is the strip of fabric between the cutting line and the stitching line. The instructions tell you whether it is already included and how wide it is. When it is included, you simply cut on the line and sew at that distance from the edge, using the guide on your machine’s needle plate.
Before anything else: measure the test square on the printed page. If it is not exactly the right size, the whole pattern is off. See how to print and assemble PDF sewing patterns.
4. Reading the cutting instructions
- Cut 2: cut two pieces from a double layer of fabric. You get a left and a right piece, mirrored, which is what you want for sleeves, side panels and back pieces with a centre seam.
- Cut 1 on fold: place the fold edge on the fold of the fabric and cut once. You get one symmetrical piece.
- Cut 1 + 1 reversed: on a single layer, cut once with the paper face up and once face down, so the two pieces mirror each other.
- Cut in lining or interfacing: some pieces are cut again in another material. The piece says which one and how many.
Lay all the pieces on the fabric before you cut the first one, so you know they fit. Keep pieces with a nap or a one-way print all facing the same direction. If you are unsure about grain and fabric width, read how to choose fabric for sewing patterns.
5. Transfer the markings to your fabric
Mark everything while the paper is still pinned to the fabric. Once it is removed, the marks are gone.
| Marking | Best way to transfer it |
|---|---|
| Notches | Snip into the seam allowance, no deeper than 3 mm (⅛″), or cut the triangle outwards. |
| Dots and dart points | Push a pin through both layers and mark each side with chalk or a washable fabric pen. |
| Dart legs and pleat lines | Chalk and a ruler, or tracing paper and a tracing wheel on the wrong side. |
| Buttonholes and pockets | Chalk or a washable pen on the right side, checked against the paper once more before sewing. |
| Delicate fabrics | Tailor’s tacks: a loose loop of thread through both layers, cut apart between them. |
6. Words and abbreviations in the instructions
| Term | Meaning |
|---|---|
| RS / WS | Right side (the side you see) and wrong side (the inside) of the fabric. |
| RST | Right sides together: place the two pieces face to face before sewing. |
| SA | Seam allowance. |
| CF / CB | Centre front and centre back. |
| Staystitch | A line of stitching inside the seam allowance that stops curved edges, such as necklines, from stretching. |
| Understitch | Stitching the seam allowance to the facing or lining so it rolls to the inside. |
| Topstitch | A visible line of stitching on the right side, for a neat finish. |
| Baste | Long, temporary stitches used to hold pieces or to test the fit. |
| Clip / notch a curve | Small cuts in the seam allowance of a curve so it lies flat after turning. |
Common mistakes to avoid
- Ignoring the grainline. A piece cut a little off grain twists and hangs badly, especially after washing.
- Cutting along the fold edge. You end up with two half pieces instead of one.
- Forgetting the notches. Without them, sleeves go in the wrong way round and seams do not line up.
- Cutting two identical pieces on a single layer. For a pair, flip the paper for the second piece.
- Snipping notches too deep. A cut past the stitching line makes a hole in the seam.
How to practise
Start with a simple garment that has only a few pieces, such as elastic or drawstring pants or a basic skirt. You will meet the grainline, the fold and the notches, without darts or buttonholes. Then move on to a shirt or a jacket, which use almost every symbol in this guide. Before you start, read the whole instructions once, and lay out all the pieces to check you have them. Ready to try? Pick one of our free pants patterns or skirt patterns.
Questions
What does the arrow on a sewing pattern mean?
A long straight arrow is the grainline. It must run parallel to the selvage of the fabric. A bracket with arrows bent towards one edge means place on fold.
What are the triangles on a sewing pattern?
They are notches. They help you match pieces when you pin them together. Snip them into the seam allowance or cut them outwards so you can see them on the fabric.
Is seam allowance included in the pattern?
It depends on the pattern. The instructions always say whether it is included and how wide it is. Check before you cut.
What does cut 2 on fold mean?
Place the fold edge of the piece on the fold of the fabric and cut, then do it a second time. You get two symmetrical pieces, for example an outer piece and a lining.
Pattern read and marked? Pick a free pattern and start cutting.