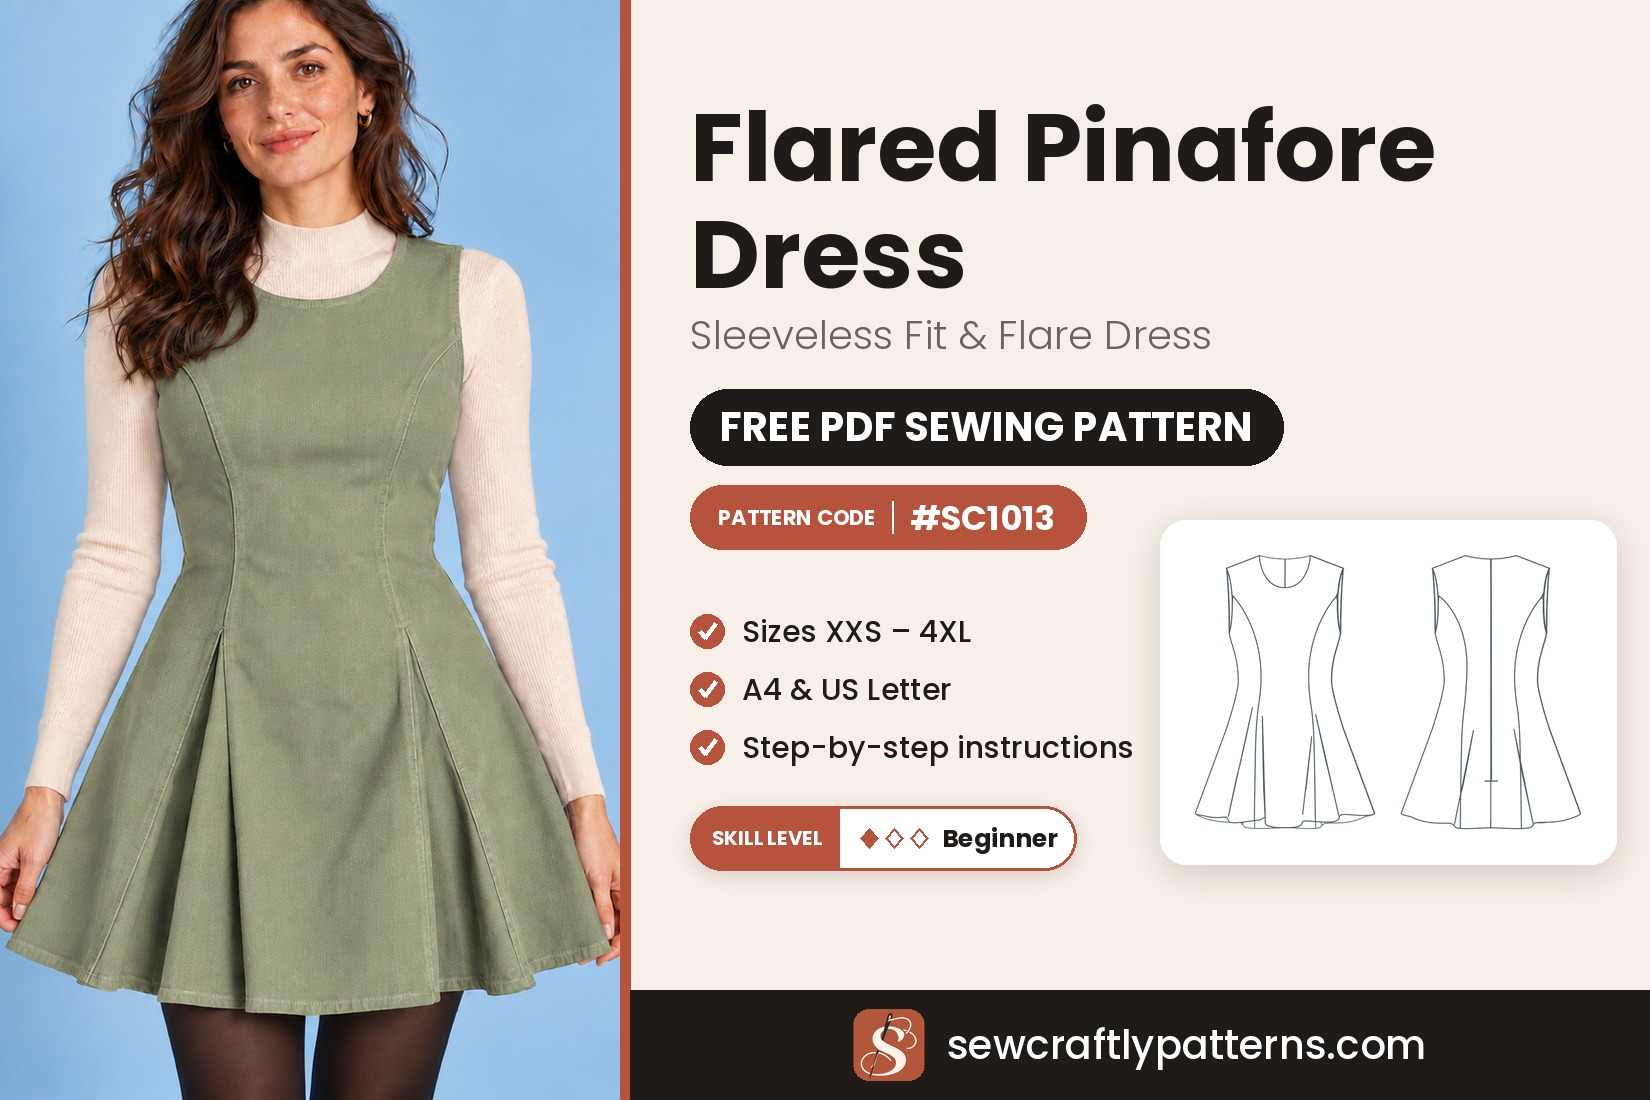
Garment Flared pinafore dress
Level Confident beginner
Sizes XXS – 4XL
Fabric Medium-weight woven
Pieces 8 (4 panels, 4 facings)
The Flared Pinafore is a sleeveless fit-and-flare dress with long princess seams. The seams shape the bodice close to the body, then open into a flared, above-the-knee skirt that swings as you walk. The neckline is a soft round scoop and a long invisible zipper closes the center back. Wear it alone in summer, or layer it over a fine knit and tights in winter, just like a classic pinafore.
This free flared pinafore dress sewing pattern is made for medium-weight wovens with some body, like non-stretch denim, cotton twill, fine corduroy or wool flannel. It is cut in eight pieces: four long panels and four facings. The neckline and the armholes are finished with interfaced facings, so there is no binding to sew, and the skirt gets its fullness from the shape of the panels themselves. There are no pleats to fold or press.
Materials
- Main fabric: 2.0 to 2.1 m (2 1/4 to 2 3/8 yd) of 150 cm wide medium-weight woven: non-stretch denim, cotton twill, fine-wale corduroy, wool flannel or a mid-weight linen blend (see the fabric table below)
- Fusible interfacing: 0.4 m (1/2 yd), 90 cm (36″) wide, light to medium weight, for the neck and armhole facings
- Invisible zipper: 55 cm (22″), the same length for every size
- Matching all-purpose thread, and topstitching thread if you want visible topstitching on denim
- An invisible zipper foot and a regular zipper foot
- Optional: a tailor’s ham, a press cloth and an overlocker
Pattern pieces
- 1 Center front, main fabric: cut 1, single layer, not on a fold
- 2 Side front, main fabric: cut 2 (a mirrored pair)
- 3 Center back, main fabric: cut 2 (a mirrored pair)
- 4 Side back, main fabric: cut 2 (a mirrored pair)
- 5 Front neck facing, main fabric + fusible interfacing: cut 1 + 1, single layer
- 6 Front armhole facing, main fabric + fusible interfacing: cut 2 + 2 (mirrored pairs)
- 7 Back neck facing, main fabric + fusible interfacing: cut 2 + 2 (mirrored pairs)
- 8 Back armhole facing, main fabric + fusible interfacing: cut 2 + 2 (mirrored pairs)
Pieces 1 and 5 are drawn whole, so cut them from a single layer of fabric, right side up. The long line on piece 1 is the center front line and also the grainline, not a fold line.
New to PDF patterns? Start here
Our free step-by-step guides take you from your measurements to a printed pattern:
- How to take your body measurements: what to measure and how, in 10 minutes.
- How to choose your size: which measurement to follow, and what to do between sizes.
- How to print and assemble your pattern: A4 or US Letter, the test box, and taping the pages.
Get the pattern
Free PDF pattern, with one file per size, XXS to 4XL (US 00–22). Share your make with #sewcraftly!
Print page 1 at 100% and check that the test square measures 10 cm (4 in). New to PDF patterns? Read how to print and assemble a PDF pattern.
Printable sewing tutorial
Need help completing the project?
Get the full printable tutorial for the Flared Pinafore: detailed step-by-step sewing instructions with clear illustrations, line sketches, a sizing guide and the list of materials you need.
- Illustrated diagrams for every step, from the princess seams to the invisible zipper
- Size charts, finished measurements and fabric amounts per size
- Video guides for the key techniques, with links and QR codes
- Printable PDF, instant download
Design details and fit of the Flared Pinafore
The dress is cut in eight long princess panels. The seams run from the armhole all the way to the hem on both the front and the back, so the shaping happens in the seams rather than in darts. The bodice sits close to the body, and from the waist the panels open into a full, swingy skirt. The neckline is a round scoop with an interfaced facing, the armholes are finished with facings instead of binding, and a 55 cm (22″) invisible zipper closes the center back seam.
The dress has about 7 cm (2 3/4″) of ease at the waist, a fitted but comfortable fit. It is drafted for a height of 167.8 cm (5′6″) and the hem falls just above the knee, about 91 cm (36″) from the center back neck in a middle size.
The folds you see in the skirt of the drawing are the natural flare of the panels. There are no pleats to fold or press: the fullness is already built into the shape of the pieces.
Difficulty and what to know before you start
The pattern is rated confident beginner. There is no lining and no buttonholes, but you will set an invisible zipper and sew two types of facing, so read all the steps once before you cut. The trickiest parts are the invisible zipper (step 4) and turning in the neck facing ends at the zipper (step 7). Have an invisible zipper foot ready, and practise on a scrap first.
Sizing guide
Drafted for a height of 167.8 cm (5′6″). The dress is fitted at the bust and waist, so choose your size by your bust and waist and compare them with the body measurements below, not with your ready-to-wear size. The flared skirt fits a wide range of hips. Between two sizes, take the larger one. Not sure? Read how to choose your size.
Letter sizes: 00/0 = XXS · 2/4 = XS · 6/8 = S · 10/12 = M · 14 = L · 16 = XL · 18 = XXL · 20 = 3XL · 22 = 4XL
Body measurements
| cm | 00 | 0 | 2 | 4 | 6 | 8 | 10 | 12 | 14 | 16 | 18 | 20 | 22 |
|---|---|---|---|---|---|---|---|---|---|---|---|---|---|
| Bust | 80 | 82.5 | 85 | 87.8 | 90.2 | 92.8 | 95.2 | 99.2 | 104.2 | 109.2 | 114.2 | 119.2 | 124.2 |
| Waist | 63.5 | 66 | 68.8 | 71.2 | 73.8 | 76.2 | 78.8 | 82.8 | 87.5 | 93.2 | 99 | 104.8 | 110.5 |
| Hips | 87.8 | 90.2 | 92.8 | 95.2 | 98 | 100.2 | 102.8 | 106.5 | 111 | 115.5 | 120.8 | 125.8 | 130.8 |
Finished garment measurements
| cm | 00 | 0 | 2 | 4 | 6 | 8 | 10 | 12 | 14 | 16 | 18 | 20 | 22 |
|---|---|---|---|---|---|---|---|---|---|---|---|---|---|
| Waist | 70.5 | 73 | 75.8 | 78.2 | 80.8 | 83.4 | 85.9 | 90 | 94.9 | 100.7 | 106.6 | 112.5 | 118.3 |
| Low hip | 93.2 | 95.8 | 98.7 | 101.9 | 105.5 | 108.9 | 112 | 116.2 | 120.9 | 126.4 | 131.8 | 137.5 | 142.7 |
| Hem sweep | 189.6 | 192.1 | 195.1 | 198.3 | 201.9 | 205.3 | 208.4 | 212.5 | 217.2 | 222.7 | 228.1 | 233.8 | 239 |
| CB length | 90.7 | 90.7 | 91 | 91.1 | 91.2 | 91.2 | 91.3 | 91.6 | 91.8 | 91.9 | 92.2 | 92.5 | 92.9 |
| Front length | 91.1 | 91.3 | 91.8 | 92.3 | 92.6 | 93.3 | 93.6 | 94.3 | 95.3 | 96.1 | 97 | 98.1 | 99.1 |
Finished measurements are taken on the dress itself and are full circumferences. Front length is measured from the high point of the shoulder to the hem; CB length is the length at center back. Compare them with a dress that fits you well.
Fabric requirements
| cm | US 00–6 | US 8–14 | US 16–22 |
|---|---|---|---|
| Main fabric, 150 cm wide | 200 | 210 | 210 |
| Main fabric, 115 cm wide | 210 | 220 | 250 |
| Interfacing, 90 cm wide | 40 | 40 | 40 |
Estimated by laying out all pattern pieces for every size, plus about 8 % for shrinkage and straightening. For a fabric with a nap or a one-way print (corduroy, velvet), cut all pieces in the same direction and add about 30 cm. Pre-wash your fabric the way you will wash the finished dress.
Common fit adjustments
Length. To lengthen or shorten, add or remove the same amount at the hem of all four panel pieces (1, 2, 3 and 4) and redraw the hem curve smoothly.
Between two sizes. Choose by your bust and waist, and take the larger size if you are in between. See how to take your body measurements if you want to double-check.
Sewing notes
Fit & style
Choose by bust and waist. The ease is already built in for a fitted but comfortable fit, so do not size down. Check the length against the finished lengths in the table.
Fabrics
Medium-weight wovens with body: low-stretch denim (7–10 oz), cotton twill, fine-wale corduroy, wool flannel or a linen blend. Avoid very thick or very stretchy fabrics.
Cutting & sewing
Follow the grainline on every piece. Snip notches no deeper than 3 mm (1/8″), chalk the ZIP mark on both center back pieces, and press every seam before you cross it.
Choosing fabric for a flared pinafore dress
A pinafore needs a fabric with enough body to hold the flare of the panels. Non-stretch or low-stretch denim and cotton twill give a casual dress, fine-wale corduroy or babycord is the classic autumn choice, and wool flannel or wool crepe makes a softer, smarter one. A mid-weight linen blend works for a summer version worn on its own.
On denim, twill or corduroy, press with steam and a press cloth on the right side to avoid shine. On corduroy, press from the wrong side on a towel so the ribs are not flattened, and cut every piece with the nap running the same way.
Sewing steps
Sew with right sides together and a 1 cm (3/8″) seam allowance unless stated otherwise. Finish the raw edges with an overlocker or a zigzag stitch as you go, and press after every seam.
- Sew the front princess seams. Pin the side fronts (2) to the side edges of the center front (1), matching the notches at the bust, waist and hip, then stitch, clipping into the curves where necessary. Finish the seam allowances separately and press open, over a tailor’s ham at the bust. Staystitch the front neckline 8 mm (5/16″) from the edge. Optional: topstitch 3–6 mm on each side of the seams.
- Sew the back princess seams. Pin the side backs (4) to the side edges of the center backs (3), matching the notches, then stitch, clipping into the curves where necessary. Finish the seam allowances separately and press open. Staystitch the back neckline, and finish the center back edges separately: they stay open for the zipper.
- Sew the shoulders. Pin the front to the back at the shoulders, right sides together, then stitch. Finish the seam allowances separately and press open.
- Set the invisible zipper and close the center back seam. Use an invisible zipper foot. Open the zipper and, from the wrong side, press the coils flat so the two rows of stitching show. On the outside, pin the open zipper face down to one center back edge, with the tape flush with the upper edge and the teeth on the 1 cm seamline. Stitch close to the teeth from the top until the foot meets the zipper pull, backstitching at both ends. Close the zipper, pin the other tape to the other edge in the same way, open the zipper and stitch. Then close the zipper, pin the back sections together below it and stitch the rest of the center back seam to the hem, starting about 6 mm above and to the left of the zipper stitching, at the ZIP mark. Press open. Stitch or hand sew each end of the zipper tape to the seam allowances only.
- Sew the side seams. Pin the front to the back at the sides, matching the notches, then stitch from the armhole down to the hem. Finish the seam allowances separately and press open.
- Finish the armholes with facings. Fuse interfacing to the wrong side of the armhole facings (6 and 8). Stitch the shoulder and underarm seams of the front (6) and back (8) armhole facings, right sides together, to make two rings, finish the seams and press open. Finish the outer edge of the facings by overlocking or zigzagging. Pin each facing to the armhole, right sides together, matching the seams and notches (double notches at the back), and stitch at 1 cm (3/8″). Grade the facing seam allowance in half and clip into the curves. Press the allowance and facing away from the dress, understitch the facing along the seamline, then turn it to the inside and press. Tack the facing at the shoulders and side seams.
- Finish the neckline with a facing. Fuse interfacing to the wrong side of the neck facings (5 and 7). Pin the front neck facing (5) to the back neck facings (7) at the shoulders, right sides together, stitch and press open, then finish the outer edge of the facing. Pin the facing to the neck edge of the dress, right sides together, matching the notches, centers and seams, and stitch. Trim and clip into the curves, understitch, then turn the facing to the inside and press. At the zipper, turn in the facing ends to clear the zipper teeth and slipstitch them to the zipper tape. Tack the facing at the shoulders.
- Hem the dress. The pattern includes a 2 cm (3/4″) hem allowance. Stitch 6 mm (1/4″) from the lower edge with long basting stitches, leaving a long thread tail. Turn in 6 mm (1/4″) on the raw edge, then turn up the rest of the allowance (finished hem about 1.4 cm / 1/2″). Pull the thread to ease in the fullness of the flare, then stitch and press. Give the whole dress a final press, using a ham for the curved princess seams.
Tips and common mistakes
Press as you go. Press every seam as soon as it is sewn, before crossing it with another seam. Press the princess seams over a tailor’s ham so the bust and waist curves stay round.
Test on a scrap. Sew a few stitches on a double layer of your fabric, with a stitch length of 2.5 mm, and fuse a small piece of interfacing to check the heat.
Trim the zipper if it is too long. The zipper is 55 cm (22″). If yours is longer, remove the excess from the bottom and secure the new end with a bar tack over the teeth.
Ease the hem, do not stretch it. The curved hem is wider than the skirt above it. Pull the basting thread gently to ease the fullness in before you stitch.
Variations to try
Topstitched denim. Topstitch both sides of every princess seam with contrast thread for a workwear look.
Corduroy for winter. Sew it in burgundy, forest green or navy corduroy for a timeless pinafore look.
Summer version. Sew it in a linen blend and wear it alone with sandals or white sneakers.
How to style the Flared Pinafore
Autumn and winter: over a fine rib turtleneck with black tights and loafers.
Layered: with a cropped cardigan or a denim jacket.
Another pinafore to sew: try our button front pinafore dress sewing pattern, a lined version with a deep V-neck.
Care
Wash the dress the way you pre-washed the fabric, inside out, at 30–40 °C. Press the facings and princess seams with steam on the wrong side. For corduroy, tumble dry low or hang to dry, and never press the right side flat.
Questions
Is seam allowance included?
Yes: 1 cm (3/8″) on all edges and a 2 cm (3/4″) hem allowance.
Which paper sizes are included?
The free download comes in A4 and US Letter, as a printable PDF with one file per size, XXS to 4XL (US 00–22).
Which size should I choose?
The dress is fitted at the bust and waist, so choose by those two measurements using the body measurement table, not your ready-to-wear size. The flared skirt fits a wide range of hips. Between two sizes, take the larger one.
What fabric is best for a pinafore dress?
A medium-weight woven with some body: non-stretch or low-stretch denim, cotton twill, fine-wale corduroy, wool flannel or a mid-weight linen blend. Avoid very thick or very stretchy fabrics.
How much fabric do I need?
About 2.0 to 2.1 m of 150 cm wide fabric (2.1 to 2.5 m of 115 cm wide fabric) and 0.4 m of fusible interfacing, depending on your size. See the fabric table above.
Does the dress have a zipper?
Yes: a 55 cm (22″) invisible zipper in the center back seam, the same length for every size.
Does the skirt have pleats?
No. The folds you see in the drawing are the natural flare of the panels. There is nothing to fold or press: the fullness is built into the shape of the pieces.
How do I lengthen or shorten the dress?
The pattern is drafted for 167.8 cm (5′6″). Add or remove the same amount at the hem of all four panel pieces and redraw the hem curve smoothly.
Is this pinafore good for beginners?
It is rated confident beginner. There is no lining and no buttonholes, and a beginner who has sewn a zipper before can follow the steps in order. The trickiest parts are the invisible zipper and the neck facing ends at the zipper.
Happy sewing!
Love our free patterns? Buy us a coffee to keep them coming, or simply share, pin and comment. Thank you!
 Support me on Ko-fi