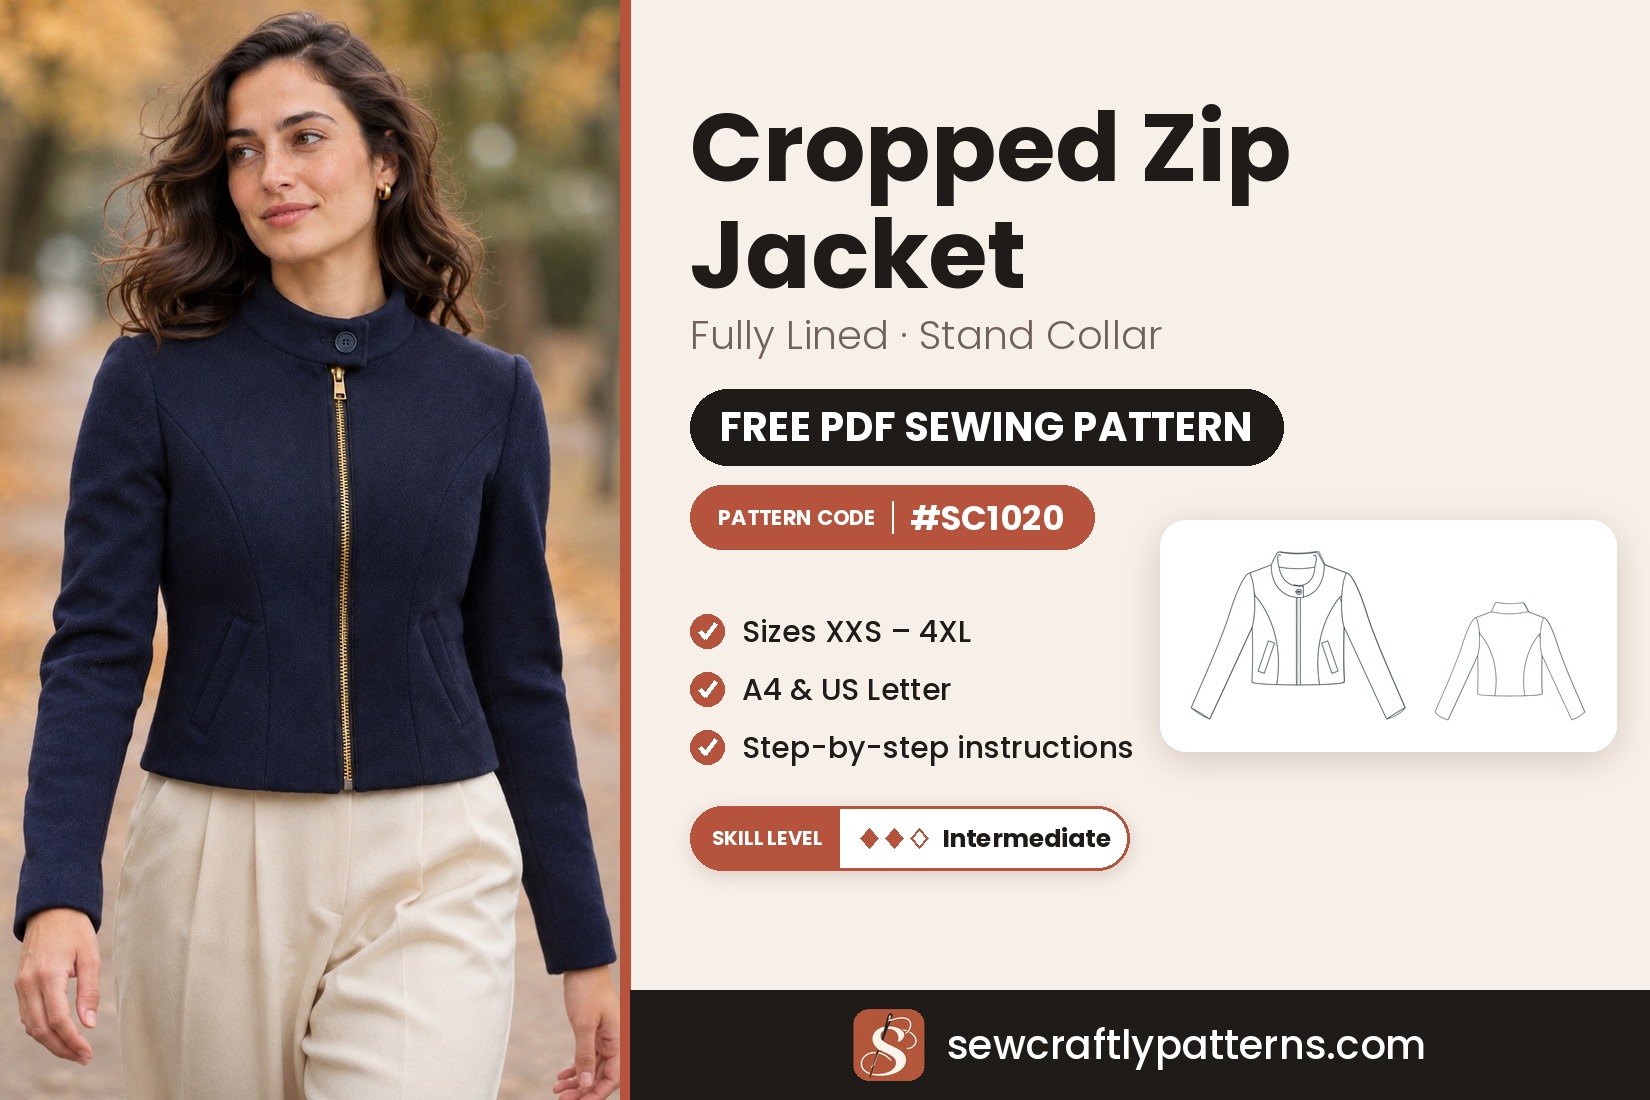
Garment Fitted cropped zip jacket, fully lined
Level Intermediate
Sizes XXS – 4XL
Fabric Wool, tweed, twill or denim
Pieces 15
This is a fitted, fully lined cropped jacket with a stand collar, an exposed front zipper, princess seams and two slanted welt pockets. It sits just above the hip, so it looks sharp over a blouse, a slim dress or high-waisted trousers. The lining is bagged out, which gives a clean inside and a smooth feel on the skin.
This free cropped zip jacket sewing pattern is for the sewist who has a few projects behind them and wants a tailored piece with a modern, sporty finish. The shape is close through the waist thanks to the front and back princess seams, and the one-piece set-in sleeves are drafted for 1 cm (3/8″) shoulder pads, which you can leave out for a softer shoulder. Make it in wool or tweed for autumn, or in cotton twill or fine denim for spring.
The jacket closes edge to edge with a 10 mm separating zipper that shows on the outside, and a small stand collar about 3 cm (1 1/8″) high finishes the neckline. The pattern comes in sizes US 00 to 22 (XXS to 4XL) with seam allowances included, and the free download has one PDF per size.
Materials
- Main fabric: 1.3 to 1.6 m (1 1/2 to 1 3/4 yd) of 150 cm wide medium-weight woven with some body: wool or wool-blend twill, gabardine, flannel, tweed or a flat bouclé, cotton twill, fine denim or suede-look polyester. Avoid very drapey or very stiff fabrics
- Lining: 1.1 to 1.3 m (1 1/4 to 1 1/2 yd) of 150 cm wide smooth lining: viscose (rayon), cupro, polyester satin or twill lining
- Interfacing: 1.5 to 1.8 m (1 3/4 to 2 yd) of 90 cm wide lightweight fusible knit or weft interfacing
- Zipper: 1 separating zipper with 10 mm (#5) visible teeth, metal or moulded plastic, 40 cm (16 in) for all sizes. You shorten it from the top to the zip opening length in the sizing guide below
- Shoulder pads: 1 pair, 1 cm (3/8″) thick (optional)
- All-purpose thread, a zipper foot, a hand-sewing needle and a pressing cloth
Fuse the interfacing to every main-fabric body piece, both facings, the stand and the welts. Thick fabrics (bouclé, boiled wool) need more room, so see the sizing note below.
Pattern pieces
- Center Front: main fabric + interfacing, cut 2 (a mirrored pair)
- Side Front: main fabric + interfacing, cut 2
- Center Back: main fabric + interfacing, cut 1 in a single layer (the centre line is marked, it is not a fold)
- Side Back: main fabric + interfacing, cut 2
- Sleeve: main fabric, cut 2
- Front Neck Facing and Back Neck Facing: main fabric + interfacing, cut 2 and 1
- Collar Stand: main fabric + interfacing, cut 2 (one outer, one inner)
- Welt: main fabric + interfacing, cut 2
- Outer Pocket Bag: main fabric, cut 2
- Lining pieces: Front Lining 2, Center Back Lining 1 (single layer), Side Back Lining 2, Sleeve Lining 2 and Inner Pocket Bag 2
Follow the grainline arrows, and on wool or any fabric with a nap place all pieces in the same direction. Cut two-piece pairs by folding the fabric right sides together so you get a left and a right.
New to PDF patterns? Start here
Our free step-by-step guides take you from your measurements to a printed pattern:
- How to take your body measurements: what to measure and how, in 10 minutes.
- How to choose your size: which measurement to follow, and what to do between sizes.
- How to print and assemble your pattern: A4 or US Letter, the test box, and taping the pages.
Get the pattern
Free PDF pattern in A4 and US Letter, with one file per size (00 to 22). Share your make with #sewcraftly!
Print page 1 at 100% and check that the test square measures 10 cm (4 in). New to PDF patterns? Read how to print and assemble a PDF pattern.
Printable sewing tutorial
Need help completing the project?
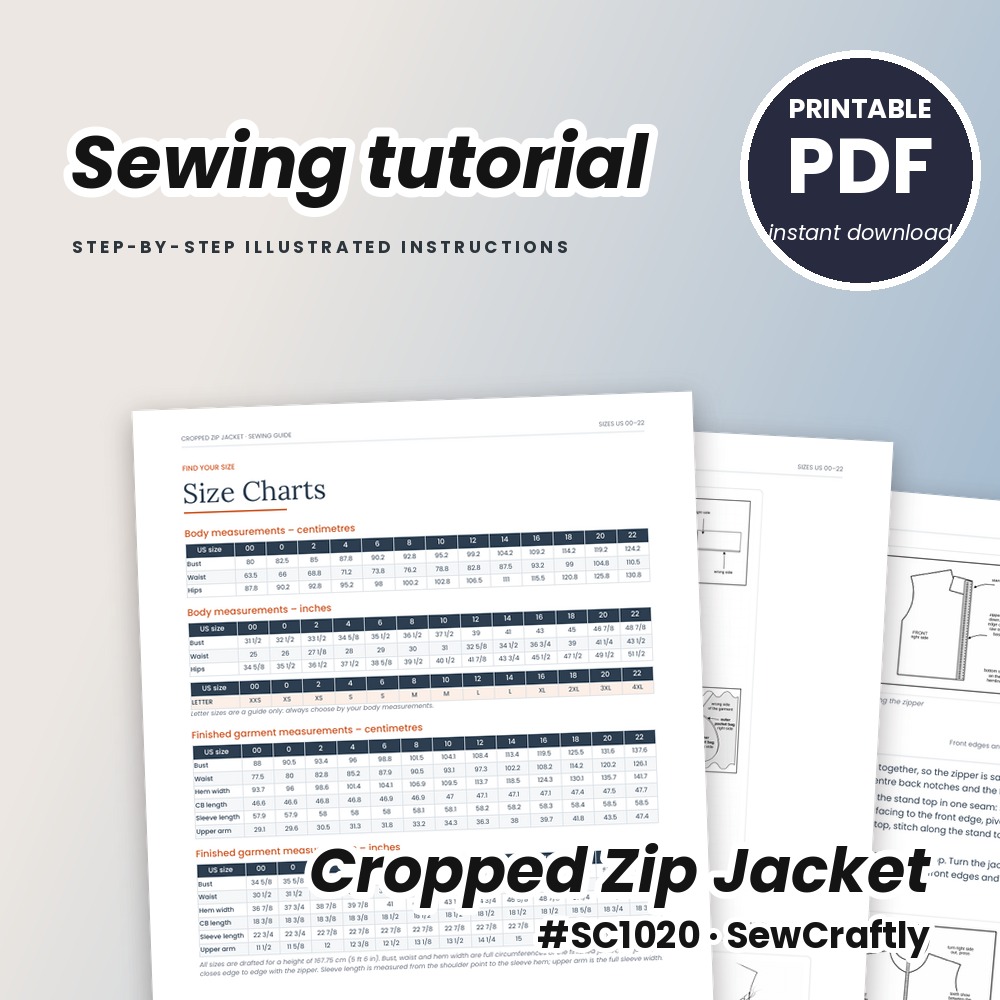
Get the full printable tutorial for the Cropped Zip Jacket: detailed step-by-step sewing instructions with clear illustrations, line sketches, a sizing guide and the list of materials you need.
- Illustrated diagrams for every step, from the welt pockets to the bagged lining
- Size charts, finished measurements and fabric amounts per size
- Video guides for the key techniques, with links and QR codes
- Printable PDF, instant download
Design details and fit of the cropped zip jacket
The jacket is fitted through the waist, with front and back princess seams that follow the body, and about 9–10 cm (3 1/2–4″) of ease at the bust over your body measurement. The centre back length is only about 47 cm (18 1/2″), so the hem sits just above the hip. The two slanted single-welt pockets sit on the side fronts, and the front edge closes with an exposed zipper that runs from the hem to the top of the stand collar.
Everything is lined: the body, the sleeves, and both neck facings. The lining is joined to the jacket with the zipper sandwiched between the two layers, then turned through a small opening in one lining side seam, which is called bagging out the lining. A small fold of extra lining length at the hem (the “jump pleat”) gives you room to move.
The pattern is drafted for a height of 167.75 cm (5′6″). To lengthen or shorten the body or the sleeves, cut and spread (or overlap) all the front, back and lining pieces by the same amount at mid-length, then blend the edges.
Difficulty and sewing time
The jacket is rated intermediate. The parts that ask for patience are the welt pockets, the exposed zipper and joining the lining to the jacket, so baste first and test each one on a scrap. Allow two or three days if you sew in the evenings. The sewing steps below are the free text version; the full tutorial has pictures for every step.
Sizing guide
Drafted for a height of 167.75 cm (5′6″). Choose your size from your bust, waist and hip measurements, not from a ready-to-wear label: the ease is already included. If you are between sizes, choose by the bust. Not sure? Read how to choose your sewing pattern size.
Letter sizes: 00/0 = XXS · 2/4 = XS · 6/8 = S · 10/12 = M · 14 = L · 16 = XL · 18 = XXL · 20 = 3XL · 22 = 4XL
Body measurements
| cm | 00 | 0 | 2 | 4 | 6 | 8 | 10 | 12 | 14 | 16 | 18 | 20 | 22 |
|---|---|---|---|---|---|---|---|---|---|---|---|---|---|
| Bust | 80 | 82.5 | 85 | 87.8 | 90.2 | 92.8 | 95.2 | 99.2 | 104.2 | 109.2 | 114.2 | 119.2 | 124.2 |
| Waist | 63.5 | 66 | 68.8 | 71.2 | 73.8 | 76.2 | 78.8 | 82.8 | 87.5 | 93.2 | 99 | 104.8 | 110.5 |
| Hips | 87.8 | 90.2 | 92.8 | 95.2 | 98 | 100.2 | 102.8 | 106.5 | 111 | 115.5 | 120.8 | 125.8 | 130.8 |
Finished garment measurements
| cm | 00 | 0 | 2 | 4 | 6 | 8 | 10 | 12 | 14 | 16 | 18 | 20 | 22 |
|---|---|---|---|---|---|---|---|---|---|---|---|---|---|
| Bust | 88 | 90.5 | 93.4 | 96 | 98.8 | 101.5 | 104.1 | 108.4 | 113.4 | 119.5 | 125.5 | 131.6 | 137.6 |
| Waist | 77.5 | 80 | 82.8 | 85.2 | 87.9 | 90.5 | 93.1 | 97.3 | 102.2 | 108.2 | 114.2 | 120.2 | 126.1 |
| Hem width | 93.7 | 96 | 98.6 | 101.4 | 104.1 | 106.9 | 109.5 | 113.7 | 118.5 | 124.3 | 130.1 | 135.7 | 141.7 |
| CB length | 46.6 | 46.6 | 46.8 | 46.8 | 46.9 | 46.9 | 47 | 47.1 | 47.1 | 47.1 | 47.4 | 47.5 | 47.7 |
| Sleeve length | 57.9 | 57.9 | 58 | 58 | 58 | 58.1 | 58.1 | 58.2 | 58.2 | 58.3 | 58.4 | 58.5 | 58.5 |
| Upper arm | 29.1 | 29.6 | 30.5 | 31.3 | 31.8 | 33.2 | 34.3 | 36.3 | 38 | 39.7 | 41.8 | 43.5 | 47.4 |
Bust, waist and hem width are full circumferences of the finished jacket, which closes edge to edge with the zipper. Sleeve length is measured from the shoulder point to the sleeve hem, and upper arm is the full sleeve width.
Fabric requirements
| cm | 00–6 | 8–14 | 16–22 |
|---|---|---|---|
| Main fabric, 150 cm wide | 130 | 140 | 160 |
| Main fabric, 115 cm wide | 170 | 190 | 220 |
| Lining, 150 cm wide | 110 | 110 | 130 |
| Lining, 115 cm wide | 130 | 140 | 160 |
| Fusible interfacing, 90 cm wide | 150 | 170 | 180 |
Estimated by laying out every piece of the largest size in each group, with pairs mirrored and without directional nap, plus about 8 % for straightening. Add 10–15 % for fabric with a nap, a one-way print or a check to match.
Zip opening length
| cm | 00 | 0 | 2 | 4 | 6 | 8 | 10 | 12 | 14 | 16 | 18 | 20 | 22 |
|---|---|---|---|---|---|---|---|---|---|---|---|---|---|
| Zip opening | 36.3 | 36.3 | 36.4 | 36.6 | 36.8 | 37.1 | 37.2 | 37.3 | 37.8 | 38 | 38.3 | 38.7 | 39.1 |
Zip opening is measured from the hemline to the top edge of the finished stand collar. Shorten the 40 cm zipper from the top to this length.
Common fit adjustments
Body length. The jacket is cropped on purpose. To change it, cut and spread or overlap every front, back and lining piece by the same amount, and change the zipper opening by the same amount.
Sleeve length. Measure from your shoulder point to your wrist and compare it with the finished sleeve length above. Lengthen or shorten the sleeve and the sleeve lining by the same amount.
Size and thickness. Choose by bust, and measure carefully first with how to take your body measurements. If your fabric is thick (bouclé, boiled wool or quilted fabric over 5 mm / 3/16″) or you want to wear the jacket over a warm sweater, choose one size up.
Sewing notes
Fit & style
Pick your size by bust. The jacket is fitted, so choose one size up only for thick fabric or a warm sweater underneath.
Fabrics
Wool or wool-blend twill, flannel, tweed or cotton twill. Choose a smooth lining such as viscose or cupro so the jacket slides on easily.
Cutting & sewing
Transfer every marking, test a seam and a welt opening on a scrap, and fuse the interfacing with steam and pressure, without sliding the iron.
Sewing a lined jacket with welt pockets and an exposed zipper
Press every seam as you go, from the wrong side, with a pressing cloth on wool or any fabric with a nap. A lightweight fusible knit or weft interfacing on the body pieces keeps the jacket soft, so test a scrap first: it should stay supple and not bubble. On thick fabric, grade the seam allowances inside the stand and along the front edges, use clips instead of pins and lengthen the stitch to about 3 mm.
Two details decide how the jacket looks. The welt pockets must be marked exactly, so transfer the pocket box with chalk and baste the welt before you stitch. The exposed zipper must sit at the same height on both fronts, so close it and compare the princess seams, the pockets and the stand before you stitch the lining on.
Sewing steps
Seam allowance is 1 cm (3/8″) unless stated otherwise. Sew with right sides (RS) together.
- Prepare the pieces. Fuse the interfacing to the wrong side of the Center Front, Side Front, Center Back, Side Back, both neck facings, both collar stands and the welts. Fuse an extra patch of interfacing over the pocket box on each Side Front. Transfer all markings, and staystitch the neckline of the fronts, back and facings 6 mm (1/4″) from the edge. Finish the main-fabric edges if your fabric frays.
- Welt pockets. Mark the pocket box on the right side of each Side Front. Fold the welt in half lengthwise, stitch the short ends, turn and press. Baste the welt over the lower line of the box, lay the pocket bags over it and stitch the two long lines of the box through all layers. Cut along the centre of the box and diagonally into the corners, push the bags through to the wrong side, stitch the bags together all around at 1.5 cm (5/8″) and edgestitch the welt ends.
- Front princess seams. Pin each Side Front to its Center Front, matching the notches, and stitch, clipping into the curve where needed. Press the allowances open over a tailor’s ham or a rolled towel and keep the pocket bags out of the seam.
- Back princess seams. Pin the Side Backs to the Center Back, matching the notches, stitch, clip the curves and press the allowances open.
- Shoulders. Stitch the fronts to the back at the shoulders and press the seams open.
- Side seams. Stitch the fronts to the back from the armhole to the hem, matching the notches, and press the seams open.
- Outer collar stand. Pin the notched edge of one Collar Stand to the neckline, centre back to centre back and the notches to the shoulder seams, so the ends finish exactly at the front edges. Stitch at 1 cm, clip the neckline allowance, trim it to 6 mm and press it up into the stand.
- Sleeves. Easestitch the sleeve cap between the EASE dots with two rows of long stitches. Stitch the underarm seam and press it open. Slip the sleeve into the armhole, right sides together, matching the underarm seam, the single and double notches and the top notch to the shoulder seam. Pull the threads to ease the cap, baste, stitch and press the allowances toward the sleeve. Do not hem the sleeves yet.
- Shoulder pads (optional). Try the jacket on with the pads in place. The straight edge of the pad sits along the armhole and the middle lines up with the shoulder seam. Hand-tack the pad to the seam allowances with loose stitches.
- Front lining and facing. On each Front Lining, bring the two marks of the FOLD zone together so a small fold forms on the front edge, and baste it in the seam allowance. Stitch the Front Neck Facing to the front edge of the Front Lining and press the allowances toward the lining.
- Back lining. On the Center Back Lining, bring the two pleat lines together and stitch from the top edge down to the circles to make the ease pleat. Press the pleat to one side and baste it across the lower edge. Stitch the Side Back Linings to it, then stitch the Back Neck Facing to the curved top edge.
- Lining assembly. Stitch the front lining units to the back lining unit at the shoulders and along the side seams, leaving an opening of about 15 cm (6″) on one side seam for turning. Make the sleeve linings like the sleeves and set them into the lining armholes. Sew the inner collar stand to the lining neckline like the outer stand.
- Zipper. Separate the zipper and lay it along the front edge with the open end on the hemline, so the top of the teeth stops 3 mm (1/8″) below the stitching line at the top of the stand. Shorten it from the top if needed. Baste each half to the right side of a front edge, teeth facing down toward the body and the tape edge on the raw edge, and check that both sides sit at exactly the same height.
- Join lining to jacket. Place the lining unit over the jacket, right sides together, with the zipper sandwiched between them. With a zipper foot, stitch along the front edge and around the stand top in one seam, pivoting at the corners. Trim the corners, grade the allowances and clip the curve of the stand top.
- Sleeve hems. Turn the jacket and lining wrong side out through the opening. Pull one sleeve and its lining out, pin the lower edges right sides together and stitch all around. Push the sleeve back, turn up the 4 cm (1 1/2″) hem, press and tack the allowance to the sleeve seam. Repeat on the other sleeve.
- Body hem. With the jacket still wrong side out, turn up the 4 cm (1 1/2″) hem and press, stopping at the facing seam at the fronts. Pin the lower edge of the lining to the raw edge of the hem allowance from one facing seam to the other and stitch at 1 cm. Let the lining fall back with its soft 1 cm fold.
- Turn and finish. Turn the jacket right side out through the lining opening and push out the stand corners and front corners. Tack the hem allowance to the princess and side seam allowances, then close the lining opening with an edgestitch or by hand. Topstitch 6 mm (1/4″) from the zipper if you like, and give the jacket a final press with a pressing cloth.
Tips and common mistakes
Baste before you stitch. The welt pockets, the zipper and the lining joins are the tricky parts, and basting lets you check the result before it is permanent.
Match both zipper halves. Close the zipper after basting and compare the princess seams, pockets and stand on both fronts. A small difference now becomes a visible one later.
Grade the seams. Trim the allowances to different widths inside the stand collar and along the front edges, and clip the curve of the stand top, so the collar turns flat and sharp.
Do not skip the lining pleats. The small fold in the front lining, the ease pleat at the back and the soft fold at the hem are what give you room to move without pulling the jacket.
How to style the cropped zip jacket
Everyday: with high-waisted wide-leg trousers, as in the photo, the cropped length shows off the waist. The wide leg pants sewing pattern is a good match.
City look: over a slim knit dress or a midi slip skirt, with ankle boots.
Casual: in cotton twill or denim with jeans and sneakers. For a longer, warmer layer next, try the hooded coat sewing pattern.
Care
Follow the care advice of your main fabric and lining. For a wool jacket, dry clean or wash gently by hand and dry flat. Close the zipper before washing and press on the inside through a pressing cloth.
Questions
Is seam allowance included?
Yes: 1 cm (3/8″) on every edge, except the pocket bags, which have 1.5 cm (5/8″). The body and sleeve hems are 4 cm (1 1/2″).
Which paper sizes are included?
The free download comes in A4 and US Letter, with one file per size from 00 to 22.
Is the jacket lined?
Yes. The body and sleeves are fully lined, and the front and back neck facings are cut from the main fabric. The lining is bagged out through a small opening in one lining side seam.
What zipper do I need?
One separating zipper with 10 mm (#5) visible teeth, metal or moulded plastic, 40 cm (16″) long for all sizes. Shorten it from the top to the zip opening length for your size.
Do I need shoulder pads?
No. The shoulders are drafted for 1 cm (3/8″) pads, but you can leave them out for a softer, slightly lower shoulder.
Is this pattern good for a beginner?
It is rated intermediate because of the welt pockets, the exposed zipper and the bagged lining. If you are new to these, practise the welt on a scrap first and follow the illustrated tutorial.
What size should I make for thick fabric?
If your fabric is thick (bouclé, boiled wool or quilted fabric over 5 mm / 3/16″), or you want to wear the jacket over a warm sweater, choose one size up.
Happy sewing!
Love our free patterns? Buy us a coffee to keep them coming, or simply share, pin and comment. Thank you!
 Support me on Ko-fi